Hằn các bạn đã quá quen với việc tạo layout trong Android. Từ cách “lâu đời ” (nhưng giờ mình vẫn rất hay dùng) là code từng dòng trong file xml đến “xịn xò” hơn là kéo thả. Đến các ViewGroup quen thuộc là LinearLayout, RelativeLayout, GridLayout, … đến mới hơn là ConstraintLayout, MotionLayout. Quen thuộc như vậy nhưng chắc rằng không phải ai cũng đảm bảo được sử dụng chúng một cách tối ưu, hiệu quả nhất, không mang lại cảm giác “slow motion” cho người dùng.

Vậy nên trong bài này mình sẽ nói về một số vấn đề hay gặp phải trong việc sử dụng layout và một số tool để khắc phục. Nào giờ bắt đầu thôi !!!
Mục lục
I. 60fps
Hẳn các bạn cũng nghe tới con số 60fps (60 frame per second). Hiểu nôm na là 60 khung hình trên giây. Càng nhiều khung hình trên một giây thì vật càng rõ, ảnh không có hiện tượng giật, lag – gamer gọi là tụt frame đó :v

Thiết bị Android cũng vậy, tốc độ refresh màn của hầu hết thiết bị là 60fps. Vậy bạn chỉ có 1/60 ~ 16 ms để vẽ một frame. Việc bạn xử lý không tốt sẽ dễ dẫn tới việc màn hình bị giật, lag.
Sang phần tiếp theo mình sẽ đưa ra các TH sử dụng layout chưa tốt nhé 😀
II. Các vấn đề
1. Chưa dùng ConstraintLayout đúng cách
Mục đích của ConstraintLayout là làm phẳng view, tránh hiện tượng ta phải làm “Nested layout” – viewgroup ở bên trong viewgroup. Nested layout sẽ khiến thời gian render view chậm hơn, dễ khiến màn hình bị giật, lác.
Là vậy tuy nhiên nhiều TH ta vẫn để nested layout bên trong ConstraintLayout. Ví dụ như sau
<?xml version="1.0" encoding="utf-8"?>
<android.support.constraint.ConstraintLayout xmlns:android="http://schemas.android.com/apk/res/android"
    xmlns:app="http://schemas.android.com/apk/res-auto"
    android:layout_width="match_parent"
    android:layout_height="match_parent"
    android:background="#FFFFFF">

    <ImageView
        android:layout_width="0dp"
        android:layout_height="0dp"
        android:background="@drawable/mdl"
        android:scaleType="centerCrop"
        app:layout_constraintBottom_toTopOf="@+id/container"
        app:layout_constraintEnd_toEndOf="parent"
        app:layout_constraintStart_toStartOf="parent"
        app:layout_constraintTop_toTopOf="parent" />

    <LinearLayout
        android:id="@+id/container"
        android:layout_width="0dp"
        android:layout_height="wrap_content"
        android:background="#20000000"
        android:orientation="horizontal"
        android:padding="16dp"
        app:layout_constraintBottom_toBottomOf="parent"
        app:layout_constraintEnd_toEndOf="parent"
        app:layout_constraintStart_toStartOf="parent"
        app:layout_constraintTop_toTopOf="parent">

        <LinearLayout
            android:layout_width="0dp"
            android:layout_height="match_parent"
            android:layout_weight="0.4"
            android:orientation="vertical">

            <android.support.v7.widget.AppCompatImageView
                android:layout_width="28dp"
                android:layout_height="28dp"
                app:srcCompat="@drawable/ic_calendar" />

            <TextView
                android:layout_width="wrap_content"
                android:layout_height="wrap_content"
                android:text="28.08.2018/ 14:30"
                android:textColor="#000000" />

        </LinearLayout>

        <LinearLayout
            android:layout_width="0dp"
            android:layout_height="match_parent"
            android:layout_weight="0.4"
            android:orientation="vertical">

            <android.support.v7.widget.AppCompatImageView
                android:layout_width="28dp"
                android:layout_height="28dp"
                android:paddingBottom="4dp"
                app:srcCompat="@drawable/ic_clock" />

            <TextView
                android:layout_width="wrap_content"
                android:layout_height="wrap_content"
                android:text="5 hours session"
                android:textColor="#000000" />

        </LinearLayout>

        <Button
            android:id="@+id/join"
            android:layout_width="wrap_content"
            android:layout_height="wrap_content"
            android:text="Join" />

    </LinearLayout>

    <TextView
        android:layout_width="0dp"
        android:layout_height="0dp"
        android:padding="8dp"
        android:scrollbars="vertical"
        android:text="Lorem ipsum"
        android:textColor="#000000"
        android:textSize="16sp"
        app:layout_constraintBottom_toBottomOf="parent"
        app:layout_constraintEnd_toEndOf="parent"
        app:layout_constraintStart_toStartOf="parent"
        app:layout_constraintTop_toBottomOf="@+id/container" />

</android.support.constraint.ConstraintLayout>
Hoàn toàn có cách để làm phẳng đoạn code trên, các bạn thử xem sao 😀
2. Lạm dụng ConstraintLayout
ConstraintLayout rất mạnh, làm được nhiều thứ, là tổng hợp của Linear, Relative, FrameLayout, … Nó áp dụng thuật toán rất phức tạp về vị trí và sắp xếp các view con. Vậy nên hiệu suất của nó sẽ thấp hơn so với các ViewGroup khác như LinearLayout hoặc FrameLayout, …
Ví dụ hai trường hợp sau
<?xml version="1.0" encoding="utf-8"?>
<androidx.constraintlayout.widget.ConstraintLayout
    xmlns:android="http://schemas.android.com/apk/res/android"
    xmlns:app="http://schemas.android.com/apk/res-auto"
    android:layout_width="wrap_content"
    android:layout_height="wrap_content">

    <ImageView
        android:layout_width="wrap_content"
        android:layout_height="wrap_content"
        app:layout_constraintStart_toStartOf="parent"
        app:layout_constraintTop_toTopOf="parent"
        app:srcCompat="@drawable/photo"/>

</androidx.constraintlayout.widget.ConstraintLayout>
<?xml version="1.0" encoding="utf-8"?>
<androidx.constraintlayout.widget.ConstraintLayout
xmlns:android="http://schemas.android.com/apk/res/android"
xmlns:app="http://schemas.android.com/apk/res-auto"
android:layout_width="wrap_content"
android:layout_height="wrap_content">
<TextView
android:id="@+id/tv_top"
android:layout_width="wrap_content"
android:layout_height="wrap_content"
app:layout_constraintStart_toStartOf="parent"
app:layout_constraintTop_toTopOf="parent" />
<TextView
android:id="@+id/tv_middle"
android:layout_width="wrap_content"
android:layout_height="wrap_content"
app:layout_constraintStart_toStartOf="parent"
app:layout_constraintTop_toBottomOf="@id/tv_top" />
<TextView
android:id="@+id/tv_below"
android:layout_width="wrap_content"
android:layout_height="wrap_content"
app:layout_constraintStart_toStartOf="parent"
app:layout_constraintTop_toBottomOf="@id/tv_middle" />
</androidx.constraintlayout.widget.ConstraintLayout>Hai view trên hoàn toàn có thể được đơn giản bằng việc sử dụng FrameLayout hoặc LinearLayout. Hiệu suất sẽ cao hơn việc sử dụng ConstraintLayout.
Chi tiết bài so sánh performance các bạn có thể xem tại đây:
https://android.jlelse.eu/constraint-layout-performance-870e5f238100
3. Layout không cần phải bắt đầu với ViewGroup
Hẳn bạn đã từng viết thế này
<?xml version="1.0" encoding="utf-8"?>
<FrameLayout
xmlns:android="http://schemas.android.com/apk/res/android"
android:layout_width="wrap_content"
android:layout_height="wrap_content">

<TextView
android:id="@+id/tv_top"
android:layout_width="wrap_content"
android:layout_height="wrap_content" />

</FrameLayout>
Ta có một viewgroup – Framelayout nhưng chỉ chứa một layout – TextView
ViewGroup mục đích để group các view. Nói cách khác, có ít nhất 2 view thì ta mới nên dùng.
Ta hoàn toàn viết được như sau
<?xml version="1.0" encoding="utf-8"?>
<TextView
xmlns:android="http://schemas.android.com/apk/res/android"
xmlns:tools="http://schemas.android.com/tools"
android:layout_width="wrap_content"
android:layout_height="wrap_content"
tools:text="Item"/>
Sẽ tối ưu và đơn giản hơn nhiều
4. include vs merge
<include> là một thẻ rất hữu ích giúp chúng ta sử dụng lại bố cục hoặc tránh tạo một tệp xml quá dài.
Quay lại mục đích của ConstraintLayout: nó làm phẳng hệ thống phân cấp của view. Giả sử rằng ta thêm thẻ <include> để thêm view vào view được bao phủ bởi ConstraintLayout. Nếu layout được import là ViewGroup thì tổng cộng chúng ta có ít nhất 2 tầng view. Do đó, điều này phá vỡ nguyên tắc sử dụng ConstraintLayout.

Cải thiện điều này như nào ??
Đơn giản thôi, sử dụng thẻ <merge>

Còn rất nhiều TH khác mình chưa đề cập ở đây. À các bạn thấy còn TH nào thì để lại comment nhé !!!
III. Các tool check viết layout hiệu quả
Có rất nhiều tool giúp các bạn phát hiện lỗi trong cấu trúc view của mình.
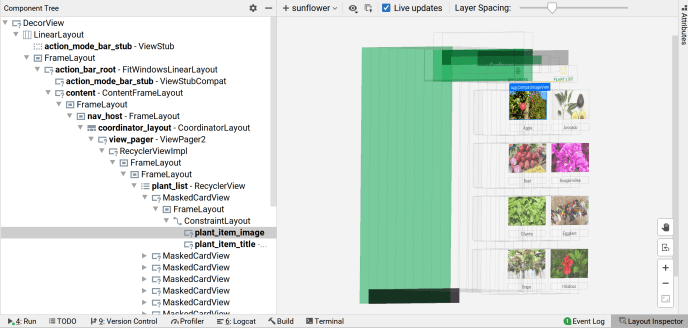
1. Layout Inspector
Cung cấp một giao diện cụ thể, trực quan về cấu trúc của layout dưới dạng cây, từ đó có thể biết được độ sâu của layout, xem cụ thể từng view, view group, … giúp ta có thể cải thiện được cấu trúc view, tìm ra được các vấn đề ảnh hưởng đến hiển thị giao diện, …
2. Lint
Chứa rất nhiều quy tắc phát hiện lỗi trong layout và cung cấp gợi ý để fix chúng
3. CPU Profiler
Xem mức sử dụng CPU của app, giúp bạn nhìn thấy toàn bộ các thread của ứng dụng trong thời gian thực. Đối với layout, sẽ giúp bạn đảm bảo các tiến trình vẽ, đo, sắp xếp được hoàn thành trong vòng 16ms mỗi frame tiêu chuẩn. Chi tiết mình sẽ để ở mục tham khảo nhé.

4. Profile GPU Rendering và Debug GPU Overdraw
Hai công cụ đơn giản có ngay trên điện thoại của bạn.
- Profile GPU Rendering: nó biểu diễn việc render UI của ứng dụng, cụ thể cho các bước render ( draw, measure/layout, animation, …), so sánh với mức 16ms mỗi frame tiêu chuẩn. Các bước được thể hiện dưới dạng cột, được đánh màu riêng. Cột nào mà vượt qua đường kẻ ngang màu xanh đại diện cho mức 16ms tiêu chuẩn là cần phải xử liền.
- Debug GPU Overdraw: xác định khi nào app bị overdraw, tức là app vẽ một pixel lớn hơn một lần trong một frame.


Tổng kết
Bài viết đã đưa ra khái niệm về 60fps – giải thích tại sao thiết bị Android bị giật lag, một số TH xử lý dễ dẫn đến hiện tượng này và đưa ra một số tool giúp phát hiện hiện tượng. Layout là một vấn đề nhất định phải quan tâm tới với một Android developer, mọi người hãy để ý nhé !!!
| Nếu bạn thấy nội dung này có giá trị, hãy ủng hộ để blog Code cùng Trung có thể duy trì và phát triển hơn nữa nhé. | Ủng hộ blog |
Tham khảo
1. https://proandroiddev.com/writing-performant-layouts-3bf2a18d4a61
2. https://medium.com/swlh/some-common-mistakes-in-doing-layout-in-android-a8ee035f199c
3. https://android.jlelse.eu/constraint-layout-performance-870e5f238100
4. https://medium.com/androiddevelopers/layout-inspector-1f8d446d048
5. https://developer.android.com/studio/profile/cpu-profiler
1 thought on “Một số lỗi khi làm việc với layout và cách cải thiện trong Android”